
The idea behind Mère de la Cupidité was to create a character fully; from game design origin to concept to final execution of a full character, styled after a historical traditional art style.
As a part of this project, I wanted to make a full character that would be brought into Unreal Engine, and create a adjustable material that replicated the traditional art style of Lithography, which was a common method of created Art Nouveau work during the late 1800s- early 1900s.
You can find the Original Process Book/Summary for the Full Project here!
Inspiration and References
The idea for this project started from my love of Art Nouveau. In my spare time throughout the years, I love to make traditional pieces that are my interpretation of the Art Nouveau style with something in the scene that breaks the character from just being "clean and beautiful" or "normal (some of which you can see in my "Other Works" Page.) Along with traditional work, I love to digitally model and texture characters and environments in both my personal and professional work. I thought my Master's project would be a great opportunity to blend both worlds and my love for traditional and digital arts.
For a little bit of Lithography history, Lithography was originally invented in Germany in the late 1790s by Alois Senefelder. The process started with using a greasy crayon on a stone, typically limestone, rolling ink on the prepped stone, and stamping it onto paper. As time progressed, so did the process of lithograph creation. By the late 1800s, lithography became an important style and method among Art Nouveau artists such as Alphonse Mucha. His work became a blend of both artistic graphical designs of nature and women and marketing for many areas of Eastern Europe. Lithography became a method of art not just recognized by other artists, but also the consumer, which expanded who saw and what opinions people had of the work.
In relation to the history of Lithography, the aim is to replicate the stone and paper blended aethstetic that the original Lithography style provides, in the Unreal Engine.
Since this was started during my Game Character Creation and Sculpting Course, I started with writing out the game that this character could fit in, below is the full PDF describing the character and some game aspects associated with them.
After the description, I worked on my concept of the character. This process actually started before deciding to go 3D with it, so there were multiple versions that this character went through (including the dog creature being much larger and a version where she had Ram horns instead of Deer antlers.)
After the idea was created, I knew I'd have to make turnarounds and the general anatomy of the character so more drawings were made of the character outside the final pose.

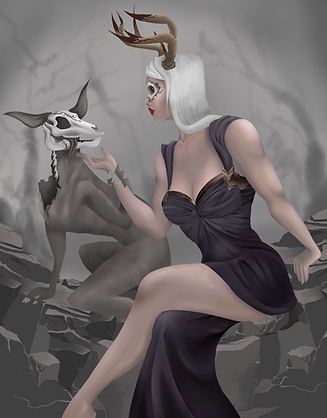

Left to right: Order of the Concepts made


Since the next step is going into 3D, I started prepping my references for both style and materials I would be aiming to replicate. While the style of Art Nouveau I was aiming towards is more graphical in design, I still wanted to make sure someone could differentiate various material types.

Sculpting/Modeling
For the Sculpting process, I had a previous personal female anatomy sculpt I was working on so I continued that into this sculpt. During the course, I was not required to make the sculpt riggable or ready for retopologizing, but I still prepped the character for such. There were also sculpts later worked on for the skull and rock assets.


Below is the 3D Turnaround of the Final Sculpt


Retopologized models for texturing/rigging


Texturing
When going into texturing, the assets would be hand-painted to simulate traditional painting methods but not with heavy stroke patterns since lithography is pressed inks typically. But part of this process would be different as the plan is to create the lithography effect in UE for more usability across multiple assets, so the effect would not be textured on during this process.


Before the texturing started, I organized the materials based on material types (metals, skin, hair, etc.) so there wouldn't be several unnecessary UE materials and texture files per asset to work through. For the character, it was separated by Regular and Dark forms, Hair and NonOrganics. Then the skull was separated into skull and ear, and lastly the rocks. The border was also organized into multiple sections but didn't require any sculpting details.


Rigging and Animation
For rigging, I used Advanced Skeleton, as I've used this with previous work and felt it was the fastest way to rig the character while also customizing blendshapes and attributes to switch between the two forms. Below is the rig with a quick recording of the animating of the 3D storyboard, followed by the quick storyboard.


Materials
Each section of the Lithography Material was created primarily through Material Functions. This allowed for better organization in both the material and the material instance, which the artist would use to easily apply to their assets. To achieve the desired look, the Lithography style had to be separated into two materials, the Lithography Material and the Shading/Line Style Post-Process Material. The Lithography Material focuses on the textural aspects and the artistic decision making of the process while the Post-Process Material focuses on the application of the Line Art and the appearance of different attributes in a material.

Lithography Material

Function Path used for Metallic, Roughness, Emissive, Opacity and AO.
The Color and Normal Functions include parameters for the basic attributes of Saturation, Contrast and Luminosity, a Stone effect (for the grit of the stone), and a Paper effect (for the subtle bump most artist papers have). The Base Color also includes parameters to add a Clouded effect (to feel more like traditional work).


Added during the process was a Lithography Mask, which was created from an adjusted black and white version of the Base Color file. This allowed for smoother and easier application of the Lithography effect on each asset. The main reasoning for this comes from lighter ink tones showing more stone and paper attributes compared to darker toned inks, such as the dark void section of the skull sockets of the Dark form.


Below is the material blueprint for the Post Process Material. There are two sections: the Shading effect and the Line Art effect. First, the shading effect is built like a cel-shading effect where light creates more distinct highlights, similar to the contrast one might find in a piece like below. Second, the line art effect is based in getting the pixel information in each direction from the edge of any asset.


The first section of the Line Art Function is added multiple times in each direction to capture the information per pixel, both in Depth and Normals. The second section adds the Depth and Normals together and with that, I added parameters for the Line Thickness and Line Color.
